Sep 11, 2011

Wild Dogs In Art Contest Winners

Here's this week's Wild Dogs in Art contest Winners!
Because I don't consider it fair to win my own contests I discount my own winnings.
Therefore....

Congratulations to Ernie Echols for his First Place winner of a
Mexican Grey Wolf!


Second Place goes to Judith Angell Meyer for her entry,
Hunter.


Tied for Third Place is Deb LaFogg-Docherty's The Greeting


and Judith Angell Mayer's Under Cover.


Nice work everyone! I wish much traffic (and buyers) come your way!

Here are the complete contest results.

Aug 30, 2011

FAA Deer Paintings Contest Winners

Tonight's FineArtAmerica winners of the Deer Paintings contest I hosted are as follows.

First Place goes to Susan Kinney for The Calm:


I entered my own art in the contest for fun, but it just wouldn't be right if I awarded myself. So although I technically won second place, I won't count that. I am awarding Second Place to the next one in line, Xueling Zou, for the entry Summer Moon Night:


Tied for Second Place is Sue Ervin's Twins painting of two little fawns:


Also tied for Second Place is Susan Kinney's Elk in the Woods entry:


Since there were quite a few entries that tied for Third Place I'm not going to post them all. Instead, as a tie-breaker, I'm going to pick my personal favorite from among the third place entries. Third Place goes to Ernie Echols for Bull Elk Freehand:


I like this piece for its simplicity, the harmonious colors, and the lovely lighting. I think it's all very well done.

Congratulations to all the winners!

Here are the contest results:
Deer Paintings Contest Results

Aug 20, 2011

FAA Animal Spots Contest Winner

I recently signed up with Fine Art America. It's a site where you can set up a gallery of images, and offer your art for sale as prints and note cards through their print-on-demand service. One of the fun little things about it is you can host and enter contests, competing with other FAA members. Some of the contests award FAA gift certificates to the winners, but most are just for fun. But it's free to enter and host contests so even doing it just for fun is worth it since it does help bring a little more traffic to your FAA gallery. And if you win a contest hosted by me you get a little extra exposure by getting a mention here on my blog and on my FaceBook page.

Besides entering a few contests hosted by others, I hosted one of my own called Animal Spots. Entries had to show spots on or relating to animals in some way. (You can enter your own contests but I didn't enter this one because I thought it might be weird if I won my own contest.)

Congratulations to the First Place Winner, Sue Melvin, for her entry Young Bluebird's Delight!


Sue Melvin has many other lovely images of birds, butterflies, and other critters as well. Check out her FAA Gallery.

You can see the rest of the entries here: Contest Results

If you're an artist I encourage you to join FAA. It's free. And if you're a member, I encourage you to enter and host contests, also free. It's fun and what do you have to lose?

Aug 11, 2011

Achieving Perfection In Our Art

We all want it in our art. We all strive for a perfect painting, drawing, or sculpture. Sometimes we get downright frustrated and fed up that we haven't yet achieved perfection. No matter how hard we try to get it right there's always something "wrong" with it.

So, how do you achieve perfection in our work? Well....

You don't.
You never will.
Get over it!

Seriously.

The sooner you let go of your death grip on "perfection" the happier you'll be. What defines a "perfect" painting is highly subjective. There is no real definition of "perfection" in art. You can be the most successful, famous artist in the world and someone will hate your work ... and that someone may even be you! In fact, if you ever reach the point where you are 100% satisfied with everything you do, that's a clear sign you have lost your marbles!

There is no perfect piece of art. Art is a progression, not a finality. If you are constantly frustrated that your art is not exactly the way you want it, you need to relax and learn to enjoy the journey, rather than only looking at the end goal. Art is an experience, not a finish line.

If you are hating your art, try to look at every piece of artwork as a step forward, not a failure. Read my blog's subtitle, "Don't be afraid to create just because your creation might be a failure. Remember, every failure brings you closer to success. So if you want to be successful hurry up and start failing as much as you can!" Learn to love your art, every piece, even the ones you want to throw away, for what they have taught you. No piece is a true failure. Every one has given you a gift, taught you something you could not have learned any other way. Love it for what it's given you. Cherish every "failed" art piece as much as the "successful" one because that successful piece would not exist if it had not been for the "failures" upon which it was built.

A lot of artists want to throw out their old or crappy work. Don't! I know right now you want it out of your sight. Fine. Put it in the attic or closet. But don't throw it away. Later, down the road, it will serve as a reminder of how far you've come. You'll cherish it as part of your history. It will serve as a reminder that, now matter how difficult things seem at the moment, it always gets better with time.

Aug 1, 2011

How to paint fur

Of course, there are many styles and methods for painting fur. But I've had a few people ask me how I paint fur, so here's one way of doing it.

There are a lot of different kinds of fur that require different techniques and brushes. As you can see in this painting there's short smooth fur, long wispy fur, thick clumpy fur, etc.


In most cases when painting fur you want to have at least 3 layers, the darkest colors being the deepest areas closest to the skin, ending with the lightest colors highlighting the tips of the fur. You'll also generally want to start with the thicker brushes on the bottom layers and finish with thinner, finer brushes for the wispy hair tips.

In this first detail (below) we have broad areas of relatively smooth fur. Use a fan brush to build up layers. Start with a larger fan to build up the bottom layer and switch to a smaller fan on the next layer. A filbert rake brush can also work here, depending on the animal and its fur type. Try to vary your brush stroke length, stroke angle, and brush angle to keep it from looking too uniform. Wild animals don't get their fur brushed so you want it to look a little scruffy. (Of course, if you're doing a pet portrait of a prize show dog then this doesn't apply. You'll want your brush strokes to stay pretty uniform so your pooch looks well-groomed.) Once the first two layers are down go back and add a few strokes here and there with a script liner to add a little more scruffiness and highlights.


In this second detail (below) we have areas of clumpy fur. Here start with a medium round brush to block in the basic shape of the clumps. Again, start with darker colors on the lower layer. Then use a smaller round to do the middle, lighter layer. Finally, go back and add some wispy fur tips with the script liner once again to the top, lightest layer. Always try to vary your stroke lengths and angles, even getting a few wiggly lines in there once in a while, to give it that "wild" ungroomed look.


Nothing really magic about the technique. It just takes remembering to go from dark to light, larger brush to thinner brush, keeping your strokes varied. And a lot of time and patience. :)

Jul 20, 2011

How to store water mixable oils

How do you store the paints on your palette between painting sessions? When I used regular oil paints I used the method of putting them in a dish and submerging them in water. Obviously that doesn't work with water soluble oils.

Nowadays, I use plastic storage containers as my "palettes" and just seal the lid and toss them in the freezer. Since I like turkey sandwiches, I usually have a few of these floating around to recycle for my painting needs:


Of course, if you don't like turkey sandwiches (why don't you like turkey sandwiches???!), you can always buy containers like these:


It may seem tacky and cheap, but it actually works fairly well. Since I now only paint with 3 primaries and white I don't need a lot of palette space. But, if I do need more space, I can use a few separate containers, one for my blues and greens, another for reds and oranges, etc.

By actually putting paints on, and painting from, these containers, it saves a lot of time and headache not having to transfer them from a regular palette each time I clean up for the day. These small, light-weight containers are also very handy for traveling and doing plein air work.

By the way, you're not actually freezing the paint by putting it in the freezer (but the cold temperature slows down the evaporation rate, preserving the paint's moisture). The oil in the paint does not freeze at the temperature of the average household freezer. It needs to be several degrees colder than that to freeze. So, since the paint doesn't actually freeze, it doesn't hurt it and you don't have to wait for it to thaw. It's ready to paint with right out of the freezer. Here's an article that talks more about it if you want to know more about it:

Freezing Oil Paint

How do you usually store your paints? And what are some of the crazy ways you've tried that may, or may not have, worked?

Jul 15, 2011

Realisic and Painterly at the same time?

I am impressed with artists who can create "realistic" art and still have a "painterly" quality about it. When you think about the definitions of the terms it really doesn't seem like it should be hard to do both. But, in reality, it is. I have tried to do this more with my art recently but so far have not nailed it down.

To do a painterly work and still have it give a realistic feel requires near perfection in color and lighting. I recently discovered the blog of plein air artist, Eckhardt Milz.

He is a master of illusions, in a way.


Look at the painting of the moose in the water. At first glance it almost looks like a photograph. But upon closer inspection (click on the image .. twice .. for a larger view) you see it has a lovely painterly quality to it. This is not easy to do. Believe me, I've tried!

I guess this shows the importance of getting out of the studio and painting plein air, and not just relying on photographs. Easier said than done, of course!

In any case, I've seen very few artists who can do this well, painting both realistically and painterly at the same time. Howard Terpning is one of the few artists who come to mind in this regard. His work is amazing. If you haven't seen it go Google it now. Amazing stuff.

Jul 9, 2011

Water Mixable Oil Paints


I recently read a blog about a way to clean up oil paints without using harmful solvents. While the advice was sound, my first thought was, "Why not just use water mixable oils and avoid solvents altogether?" But then I remembered my recent visit to a local art supply store to buy some water mixables. They didn't have any. I asked the clerk why they didn't carry them. She said they didn't carry them because they just don't sell.

Hmm. Why not? Why aren't artist buying these? In fact, why aren't artists demanding them? Why would anyone want to subject themselves to toxic, smelly chemical solvents if they don't have to? I started asking around and soon discovered that most artists who had ever tried water mixable oils had tried them around the time they were first introduced back in 1992 by Grumbacher as MAX water soluble oils. Artists were quickly disappointed and frustrated by their gummy, tacky properties. I myself tried them and was seriously disappointed, promptly returning to my traditional oils, stinky solvents and all.

Nothing against Grumbacher, mind you. They make fine products. It was just the technology of the time. There were no companies who had got it quite right yet back then.

But years passed and things changed. Water mixable oils have come a LONG way since 1992.

Seriously, if you have not tried them in the last several years you really should give them a second chance. I switched from regular oils to water mixables several years ago and I haven't looked back. There is almost no difference between the look and feel of regular oils and water mixables these days. The only thing you give up is the toxic solvent!

I've tried a few different brands. I quickly fell in love with Van Gogh H2O water mixables because of their soft, creamy texture. I paint fairly detailed and soft oils work better for me. I can paint fine detail without having to thin them much, if at all. Van Gogh H2O water mixable oils were produced by Royal Talens and were considered "student grade" paints. I, however, was never disappointed in them. Nevertheless, 
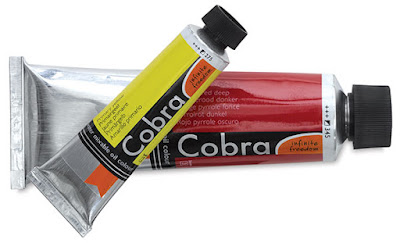
Royal Talens decided to discontinue them and replace them with "artist grade" Cobra water mixable oils. I recently replaced some of my dwindling H2O paints with Cobra and I am just has happy as ever with them. They are wonderful! They have the same lovely creamy texture and beautifully rich colors as their H2O paints but now I know they are higher grade and that's just fine by me.

I have also tried Winsor Newton's Artisan Water Mixable Oil Colours. It's a good product but a little too thick and stiff for me. It's harder to do the fine detail with a thicker paint.

I've also tried Holbein Duo water mixable oils. This is also a good product and I use them with my Cobras sometimes. Their "thickness" is somewhere in between Artisan and Cobra.

I personally prefer Cobra among the 3, not because the others are not good products, but because the smooth creamy texture of Cobra works well for the sort of fine detail I like to do.

They are all very good paints, much better then their 1990-something predecessors. Which brand you'd prefer depends on how you paint. If you paint impasto then Artisan is probably your best choice. If you paint fine detail, like me, give Cobra a try. If you're somewhere in the middle then Holbein Duos may be your best option.

Whatever your style of painting, please take the time to give water mixable oils another chance. They have improved a LOT since they were first introduced. If you're like me, you'll be so happy to be away from smelly, toxic solvents and know you're doing a good thing for your health by switching!

Comment below with your thoughts. Have you ever tried water mixables? How long ago? Have you tried them recently? How do you paint (detail, impasto)? Which brands do you like best?

Jun 21, 2011

Featured Artist on EmptyEasel.com

Well, I just found out the other day I was added to the Featured Artist section of the popular Empty Easel website. That was a nice surprise! Thanks Empty Easel!

Empty Easel

May 31, 2011

Fox pup painting detail

I finally got around to getting a high-res, high quality image of the fox-in-the-tree-stump-den painting. (Still trying to think of a good title for this one. Any suggestions?)
If you read my previous post about this painting you'll know it was the first piece I've ever done with only the 3 primaries (and white), and how that turned out to give the painting some really wonderful grays and browns. Unfortunately, the first images I posted did not do it justice (now replaced). Here are some better images, showing the rich color variations in what's basically a plain brown tree stump.


Below is a closeup of the detail of the tree stump near the top of the image. At first what looks like a gray/brown tree turns out to be full of wonderful blues, greens, purples, oranges, and yellows. I just love it!

May 29, 2011

New Licensing Deal!

My artwork is now available as a jigsaw puzzle! I'm really happy to have signed a deal with Buffalo Games along side such notable artists as Darrell Bush, Lesley Harrison, and The Hautman Brothers.
Well, it's actually not that new. I'm just a little behind updating my blog and web site. I actually signed the deal at the end of last year. I think the puzzles became available around March. Anyway, it's here now, and I look forward to creating some more images for them in the future.

Shop Art Supplies

Related Posts Plugin for WordPress, Blogger...